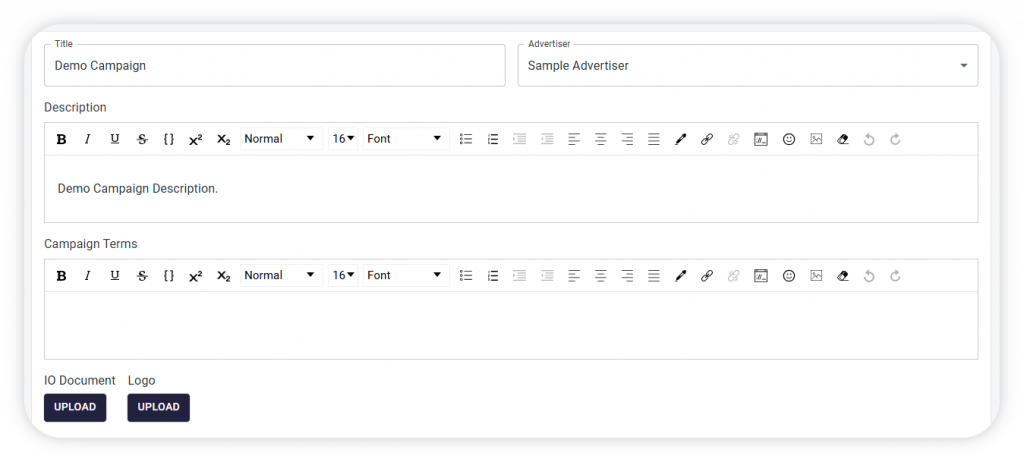
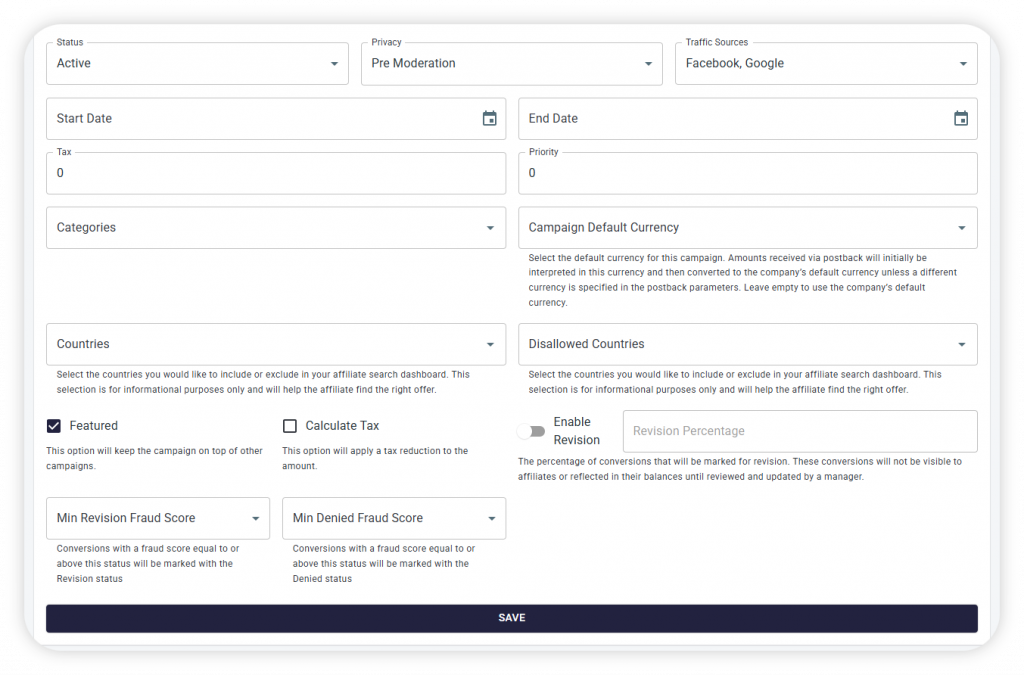
When editing your campaign, a secondary menu will appear displaying all of the aspects you can configure for the campaign, on this article we’ll focus on the ‘General’ tab.

General
On the general page you will provide the first thing that the affiliate sees about the campaign such as the campaign name, description, terms, logo, etc.

Title
Set a title for your campaign. If you only intend to use one campaign you can give a general name like ‘Affiliate Program’ or if you create a campaign for a specific goal.
For example an e-commerce shop that opens a campaign for her summer sale, then it can be named ‘Summer Sale’. Choosing a name that best describes the purpose of the campaign will help affiliates understand their objectives.
Advertiser
This is where you choose the brand that is offering this campaign. For example if you are a company with multiple sub-brands, you can configure each brand as an advertiser and choose which advertiser is relevant to this campaign.
Or, if you are an affiliate network, each company you work with will be considered an advertiser and this section will help you differentiate between them by allowing to later filter campaign by advertiser.
Description (Optional)
Here you can enter any information you deem relevant to the campaign and affiliates, it can be a description about your company, or the goals and objectives of the campaign.
Campaign Terms (Optional)
Here you can specify the terms or relevant conditions about the campaign, for example what type of commission you offer to affiliates, how often do you release payments, etc.
IO Document (Optional)
You can attach an Insertion Order (IO) document which will serve as a contract between you and the affiliates.
Logo (Optional)
Adding a logo to the campaign will help you with differentiating between different campaigns. The acceptable resolution is 180×45

Status
Control the status of the campaign by making it Active, Paused or Disabled.
Only Active campaigns are visible to affiliates.
Traffic Sources
Informative Only, Affiliates will be able to see which traffic sources are relevant to the campaign.
Privacy
Handle affiliate application to join the campaign.
Public Auto Approve – Affiliate will automatically be accepted after he accepts the terms and conditions of the campaign.
Pre Moderation – Affiliate can see the campaign and apply to it but will require manual approval.
Private – Affiliates cannot see the campaign and you can assign affiliates manually to the campaign.
Public – Every registered affiliate is participating in the campaign by default.
Tax (Optional)
Set the tax percentage for your sales to calculate affiliate commissions based on the net amount (excluding taxes).
For example, if your sales include an 18% tax and a customer pays $118 (including tax), the net sale amount is $100. If the affiliate earns a 10% commission, it will be calculated from $100 instead of $118 when this option is enabled.
Start/End Date (Optional)
A campaign can be set to be temporary by setting an end date, or you can publish a future campaign early on to give affiliates time to apply.
Categories (Optional)
You can create campaign categories in your settings and apply a category to a campaign to easily filter campaigns on the campaigns list.
For example, affiliate networks that work with advertisers from different fields can create categories like ‘eCommerce’, ‘SaaS’ and apply these categories to the relevant campaigns.
Campaign Default Currency (Optional)
Set a campaign specific default currency, any conversions under this campaign that will be received without a specific currency will be attributed this default currency and then converted via exchange rate to the company currency.
Priority (Optional)
A lead distribution tool that allows you to set a priority on a campaign to traffic leads to a higher priority campaign (Higher value means more important)
Countries (Optional)
Informative Only. Select the countries this campaign is relevant for, this will also help affiliate to filter campaigns by country to see which offers may be relevant to them.
Disallowed Countries (Optional)
Informative Only. Select the countries this campaign is not relevant for, this will also help affiliate to filter campaigns by country to see which offers may be relevant to them.
Featured (Optional)
Campaigns that have this checkbox marked, will appear first in the campaign list.
Calculate Tax (Optional)
Checking this checkbox will deduct the tax percentage that you provide in the ‘Tax’ field from the sale amount in order to display the net amount on the platform.
Revision (Optional)
Toggle on and set a percentage to hide a portion of the affiliate’s conversions for review purposes, the conversion’s status can later be updated on the ‘Conversions’ page. While in revision, these conversions will not be shown to the affiliate. You can also set a custom revision percentage or disable it for specific affiliates entirely.
Min Revision Fraud Score (Optional)
For each incoming conversion we display a fraud score in percentages (1%-100%). Inserting a minimum revision fraud score will set the conversion in status ‘Revision’ for all conversion with a fraud score with the value you input and above.
Min Denied Fraud Score (Optional)
For each incoming conversion we display a fraud score in percentages (1%-100%). Inserting a minimum denied fraud score will set the conversion in status ‘Denied’ for all conversion with a fraud score with the value you input and above.
