If your webstore uses Stripe as your payment processing platform, you are able to track the purchases and view them directly on your Tracknow dashboard after integration.
Integration Overview
Forwarding the click_id parameter to the landing page
When a potential client clicks an affiliate link, TrackNow logs their IP address. Normally, we match this with the purchase IP to track sales and attribute them to the correct affiliate. However, since Stripe processes the purchase data, the IPs won’t match. To ensure proper tracking, we need to forward the click data with the purchase, allowing our system to link the sale to the right affiliate
Adding the click_id parameter to the payment link
When the client lands on your page with the click_id parameter appended to the URL, you will need to store this parameter and add it to the payment link (the actual button clients click to start the payment process)
Send this data back to Tracknow with the purchase details
Once the payment is complete on Stripe, the click_id parameter must be returned to Tracknow along with the purchase details (order_id, amount, etc)
Integration Process
STEP 1 – Appending the click_id parameter to the landing page URL
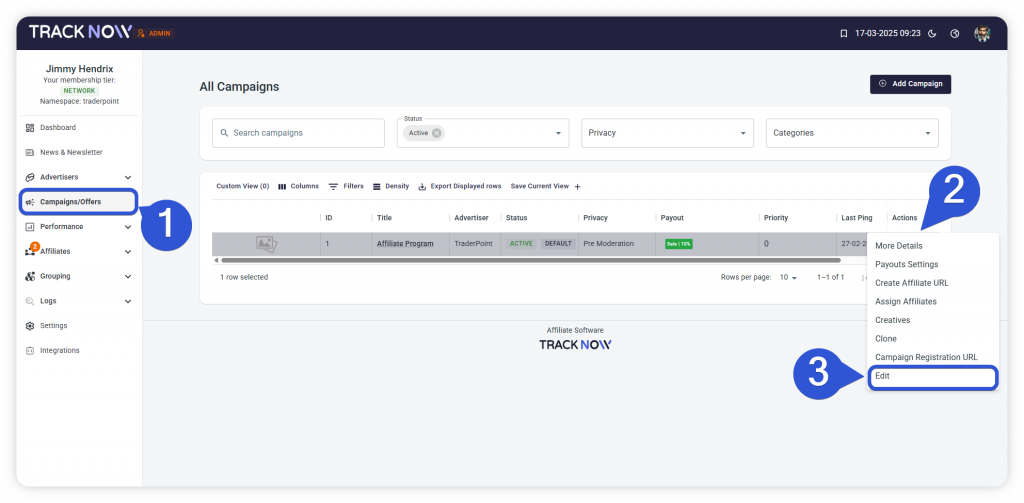
- Login to your Tracknow dashboard and click the ‘Campaigns/Offers’ screen
- Click the 3 dots icon (Actions column) on your campaign’s row
- Select ‘Edit’
- Navigate to the ‘Tracking’ tab
- Append the ‘click_id’ macro to your landing page’s URL
- Add it to the deep URL as well
- Don’t forget to save the changes
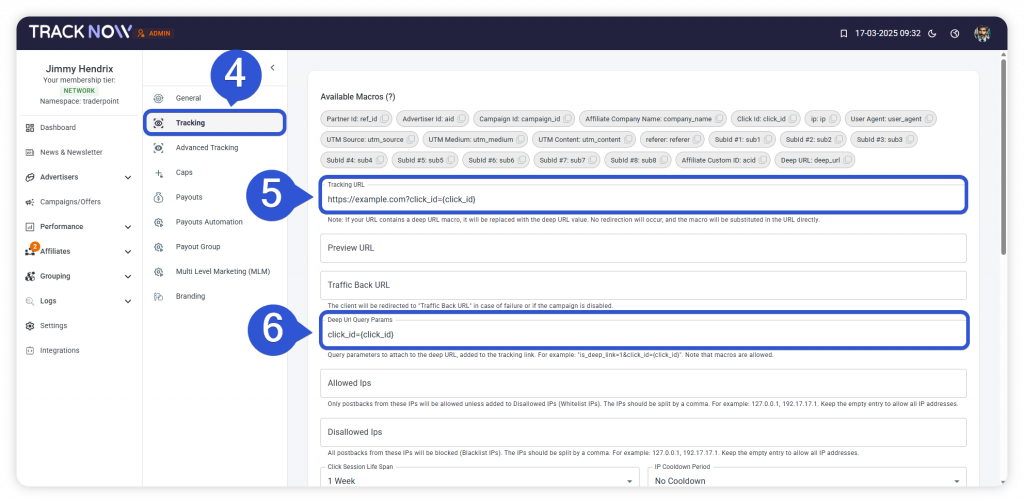
Once this is done, each time a client will click an affiliate link, he will be directed to your landing page and the click_id parameter will be added to the URL in the address bar, for example:

STEP 2 – Adding a script on every page of your website to store this parameter
In order to store the click_id parameter, you will need to implement the following code on all of the pages of your website:
(function() {
    const v = new URLSearchParams(window.location.search).get("click_id");
    if (!v) return;

    const d = new Date();
    d.setTime(d.getTime() + (365 * 24 * 60 * 60 * 1000));

    document.cookie = `tn_click_id=${encodeURIComponent(v)}; expires=${d.toUTCString()}; path=/; Secure; SameSite=Lax`;
    localStorage.setItem('tn_click_id', v);
})();
This code will ensure that no matter which page of your website the client will land on, the click_id parameter will be saved and stored.
STEP 3 – Adding the stored click_id parameter to the payment link
Since the stripe payment page is not on the same domain as your website, the click_id parameter will not be available by default and we’ll need to manually transfer it to the payment page as well.
This can be achieved by adding the following code to every page that links to the Stripe payment page:
(function() {
  function getCookie(name) {
    let cookieArr = document.cookie.split(";");
    for (let i = 0; i < cookieArr.length; i++) {
      let cookiePair = cookieArr[i].split("=");
      if (name.trim() === cookiePair[0].trim()) {
        return decodeURIComponent(cookiePair[1].trim());
      }
    }
    return null;
  }

  function updatePaymentLinks() {
    let clickId = getCookie("tn_click_id") || localStorage.getItem('tn_click_id');
    if (!clickId) return;

    document.querySelectorAll('a[href^="https://buy.stripe.com"]').forEach(paymentLink => {
      let url = new URL(paymentLink.href);
      url.searchParams.set('client_reference_id', clickId); // Automatically handles "?" or "&"
      paymentLink.href = url.toString();
    });
  }

  updatePaymentLinks();
})();
This code will check if there is a stored click_id parameter and if it found one, it will append it to the payment link itself as ‘client_reference_id’.
When the client clicks the payment button/link, his landing payment page URL will look similar to this:

STEP 4 – Getting your Stripe Webhook URL from Tracknow
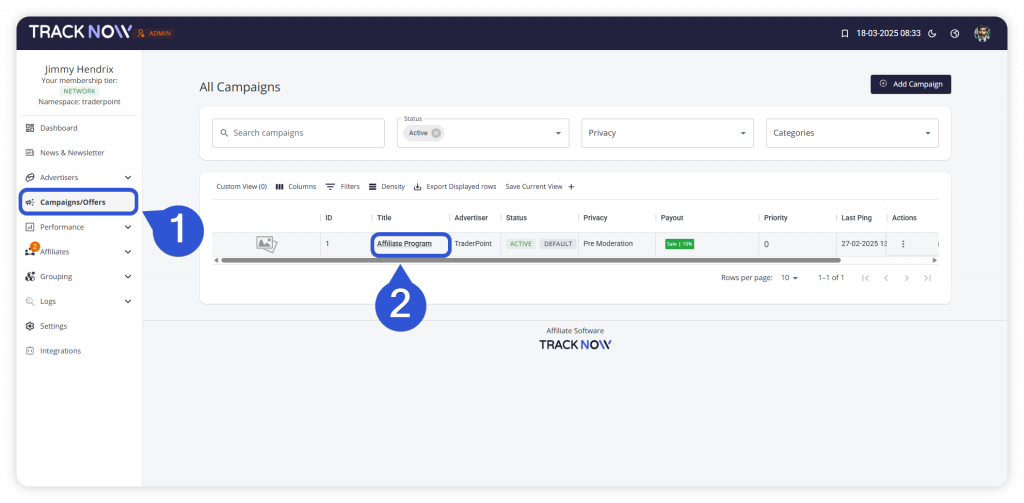
- Login to your Tracknow dashboard and click ‘Campaigns/Offers’.
- Click on the name of the campaign
- Click ‘Setup/Integration’ in the sub-menu
- Navigate to the ‘Stripe’ tab
- Copy the Stripe Webhook URL
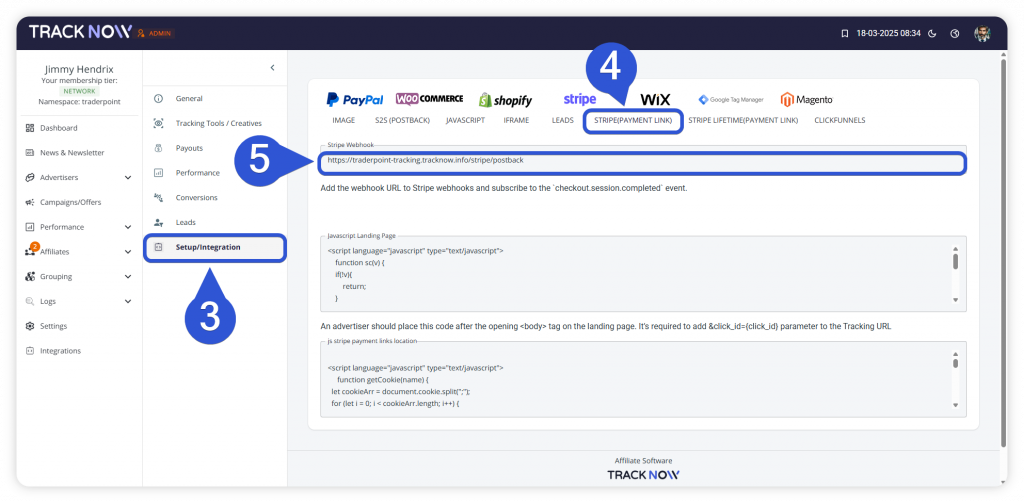
This is the URL to which the data should be sent after each purchase.
STEP 5 – Sending the data back to Tracknow when a purchase is complete
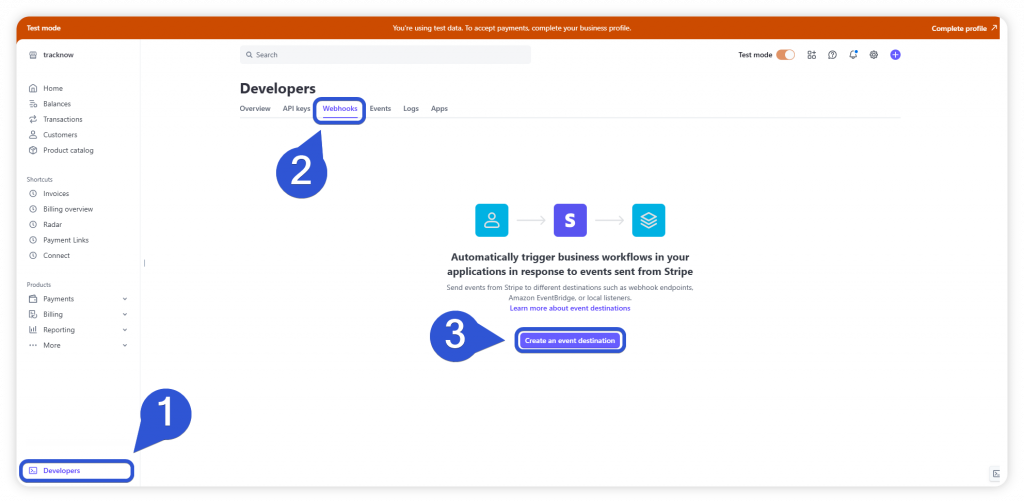
- Login to your Stripe account and click the ‘Developers’ screen
- Navigate to the ‘Webhooks’ tab
- Click ‘Create an event destination’
- In the ‘Endpoint URL’ field fill out your Tracknow Stripe Webhook URL copied in the last step
- Under ‘Select events to listen to’, select ‘charge.succeeded’ & ‘checkout.session.completed’
- Click ‘Add endpoint’
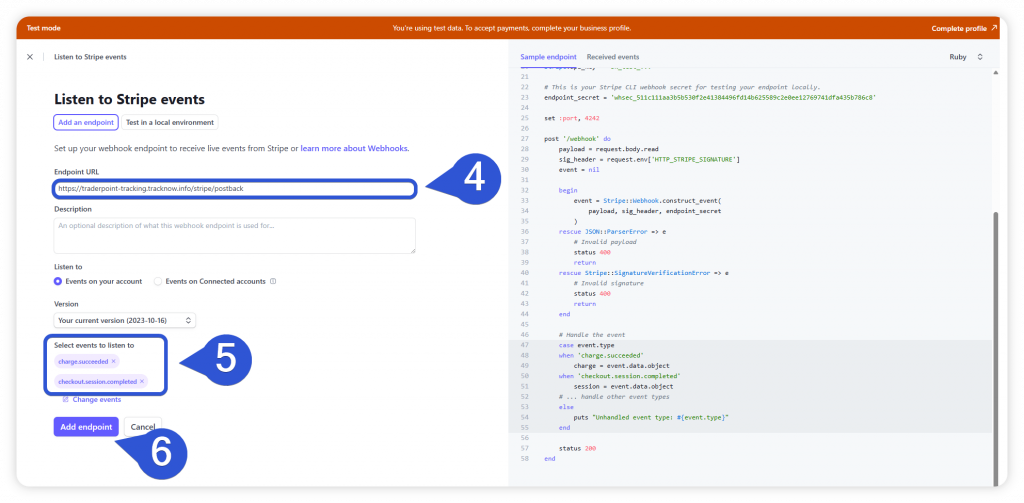
This setup will look for events such as successfully completed payments and checkouts and when an event like that occurs, Stripe will automatically send the purchase data to your Tracknow dashboard via the Webhook URL you inserted.
